
[104] Parameters - Field of View #1
If you are, just like me, fairly new to Orbiter you probably are a bit confused about the whole Field of View (FOV) thing, and the user manual just doesn't really help explain what exactly is the FOV and what value you should be using:
The camera aperture can be adjusted under the FOV tab in the Camera dialog. The supported range is between 10 and 90 degrees (Orbiter definies the field of view as the vertical aperture, between the top and bottom edge of the simulation window). The most natural aperture depends on the size of the simulation window on your screen and the distance between your eyes and the screen. Typical values are between 40 and 60.
The camera aperture can be adjusted under the FOV tab in the Camera dialog. The supported range is between 10 and 90 degrees (Orbiter definies the field of view as the vertical aperture, between the top and bottom edge of the simulation window). The most natural aperture depends on the size of the simulation window on your screen and the distance between your eyes and the screen. Typical values are between 40 and 60.
The trick to understand the FOV, is to realize that your screen (or the window if you are not running in full screen) is seen by Orbiter as a window on whichever spacecraft you happend to be flying. So what you are seeing on your screen, is pretty much what you will see in reality if you were looking from a given position inside your spacecraft (the viewpoints are sets by the spacecraft's developers as the position of your eyeballs inside the spacecraft).
In order to render on your screen a realistic view, Orbiter need to know how far away from your screen you are, so that it can adapt the rendering. Considere this: If you are looking outside from your house, at a car parked on the street and that you step away from the window to about twice the distance you were at before, the car will not look twice smaller than before ... However, if you do the same whiles looking on your screen, that spacecraft you were going to dock with will look twice smaller ... not very realistic, right?. To help avoiding this kind of effect, you need to adjust the FOV value according to the distance from the screen to your eyes.
Calculating the FOV is actually not very complicated as it is simply one of the angles from the triangle formed by your eyes and the vertical edges of the screen:
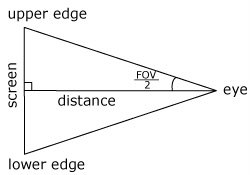
With a bit of basic trigonometry, we can write the following formula:
(screen_height / 2) / distance = tan (FOV / 2)
and calculate the FOV as
FOV = 2 * tan-1((screen_height / 2) / distance)
In my case, the distance from my eyes to my screen is around 53cm and the height of the viewable part of my screen is 27cm (I use Orbiter in full screen). If I apply the formula above, I then obtain a FOV value of about 0.499 ... huho ... oh wait it's in radian! A quick conversion to degree (value * 180 / Pi) and I have a value of 28.6 that I can directly enter in Orbiter as my FOV :)
If you are still a bit confused, considere that Orbiter is interested in knowing how much of your vertical field of view is occupied by your screen, so that it can render what you will be seeing if your were in a spacecraft, looking trought a window of the size of your screen. Of course, because our screen sizes are limited, we only see a small portion of what you will see in reality (human vertical field of view is around 180 degree), but thanks to a proper FOV value what you see is realisticaly scaled and located.
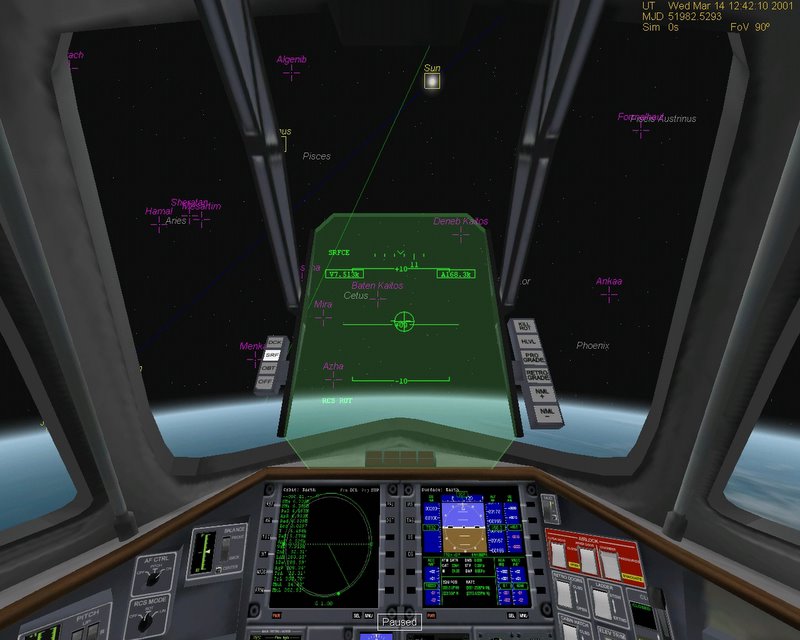
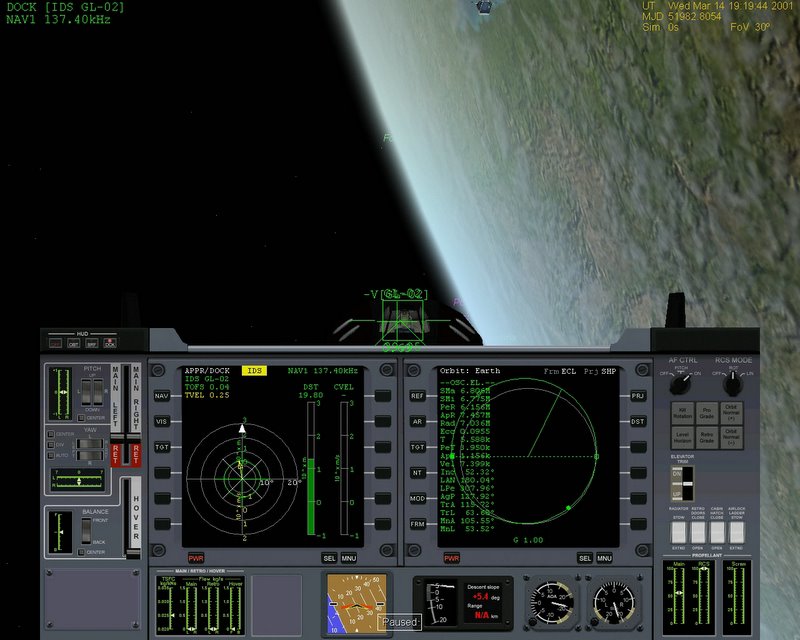
Let's look at what I see on my screen when using the virtual cockpit (VC) of the Delta-Glider (DG) with the FOV value we just calculated:

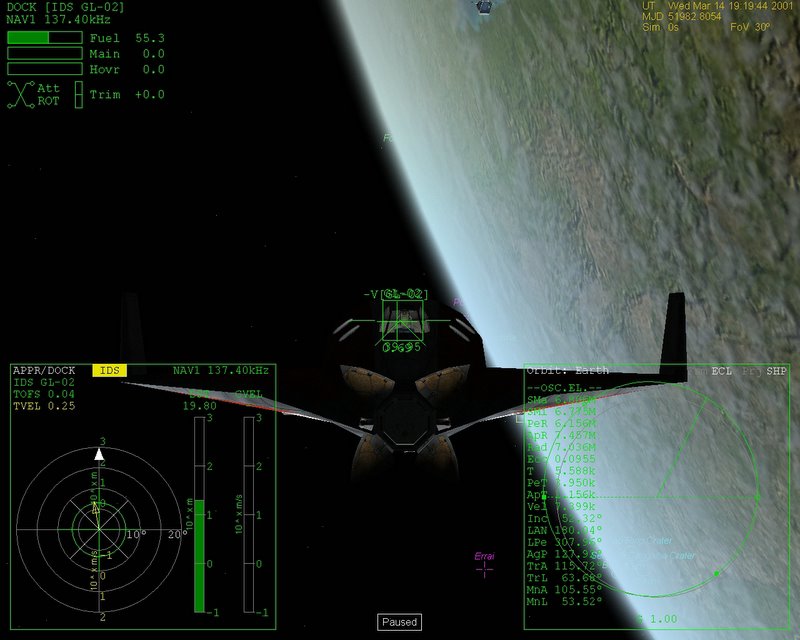
Pretty up-close eh? Did I made a mistake? Let's have a look at the spacecraft in outside view:

Hmmm ... it looks like what Orbiter is showing us in the cockpit view is about right ...
The Head-up display (HUD) is really right in front of the pilot eyes, so the FOV we calculated is (about) correct. Now, if you want to see some of the instruments, you need to move your virtual head around quiet a lot ... and that can be a bit inconvenient. Depending on your preferences you may want to adjust the FOV to allow you to see more of the cockpit. It will be less realistic looking (specially with a very high FOV), but more practical. The following screenshot show the VC with a FOV of 90 (note the distortion on the edges of the image):
It is interesting (but somewhat not surprising) to know that whatever cockpit mode you are using (VC, 2D or generic), the view that Orbiter renders will alway be the same:
I don't know about you, but something on the second images above doesn't feel right to me ... In Orbiter, the 2D cockpits are simply rendered on top of the 3D view without any scaling to adapt the size of panels to whatever FOV you are using, leaving on the same screen two displays that are not at the same scale, thus somewhat throwing your brain off-balance when trying to to estimate distance and size. There is nothing wrong with the way Orbiter do it, but I beleive that adapting the FOV when using a 2D cockpit may be required when you want to look at something that look somewhat realistic. In the example above the 2D cockpit as a screen width around the same than the HUD in regard to the scene, altought it will be many times bigger in reality. Your brain may realize that the panels are a scaled down version of the reality so the scene shown must also be scaled ... From there, it's all about perception and how close to the real thing you want to stay.
In the next post, I will try to explore this question with the georgous CSM and LM 2D cockpits made by the NASSP team:

Don't hesitate to comment on this post if you have any question, objection or comment related to its quality or content. Thanks.
posted by DarthVader at 9:30 PM
![]()


7 Comments:
This is a useful discussion. As an optical engineer, I should know something about FOV and vision etc., and I do, but I also take a very pragmatic view of simulator views since I have been using a lot of different flight simulators for some 12 years now. So your analysis is a very accurate approach to trying to relate screen viewing to real-world viewing, especially if you are trying to judge distances and sizes. But my approach is usually "let me set it so I can see what I need to see" even if it's not size/scale accurate.
In practice, this means I normally use a FOV of around 50-60 degrees, which corresponds roughly to a "normal lens" for an SLR camera. This is more wide angle than your 28 degree case, which is probably more or less right (as you show with the 3D HUD). But what we don't have in sims is the natural ability to scan that FOV around quickly and smoothly (and unconsciously) by moving our eyes and head. Just this morning I was looking at the (real) Sun, and thinking how much bigger it seems than the Sun in Orbiter. But then I thought about what a small area of the 180 degree sky hemisphere I see when I look at the Sun - and relative to (say) my car windows, the apparent width of the Sun is about the same as in Orbiter.
You can also think of the FOV as a camera-like zoom -- 10 dg is very telephoto, 50 dg is normal lens, 80-90 dg is wide angle. Then there's the camera distance to worry about (PgUp/PgDn or mouse wheel).
A flexible system (FOV plus camera distance), but it can be a bit confusing too. But it is much like a camera -- you can make something look bigger by zooming the lens, or you can walk closer to it. The effects are similar but somewhat different especially with respect to background objects and perspective.
-Bruce
P.S. This is long winded already, but you can really use much smaller FOV's if you have a head-tracking setup, like TrackIR3, which I do, though I have only used it with FS2004 not with Orbiter. In this case your mind accepts a smaller FOV because you can quickly and naturally glance down, just like looking at the speedometer in your car, which is normally out of your clear FOV while driving (it's in your peripheral vision). This is very cool, but Orbiter doesn't have native TrackIR support, so you would have to use mouse emulation mode, which doesn't work as smoothly.
Thanks for your comments Bruce. I have done a fair bit amount of flight simulator myself, and in most of them, the 2D cockpit were a scaled down version of the reality, thus the scenary shown to you was also scaled (in most case). This is something I have been trying to reproduce in Orbiter. More on that in my next 104 section post ;-)
a book called teething symptoms, this book explains these parameters further, I loved reading this blog, is very useful information!
You have a very good blog that the main thing a lot of interesting and useful!
Buy Anti-Depressants Drugs
This comment has been removed by the author.
Useful article which was very helpful. also interesting and contains good information.
to know about python training course , use the below link.
Python Training in chennai
Python Course in chennai
Your article is detailed, thanks to it I solved the problem I am entangled. I will regularly follow your writers and visit this site daily.
Java Training in Chennai
Java Course in Chennai
Post a Comment
<< Home